Before-Save flows are the record-triggered flows executed before saving the records into the database much like the before triggers in Salesforce. In this post, I will show you how to create a simple before-save flow on the standard order object in Salesforce.

Use Case
The business has a requirement to copy the Account's Billing Address and Shipping Address automatically on creating and updating an order.
Step by Step Flow Solution
- Go to setup and search for
flows. - Open the
Flowspage and clickNew Flow. - Select the
Record-Triggered Flowoption and click create. -
Select the Object and select the trigger event
A record is created or updatedlike below:
-
Now scroll down further on the same page and in the
Set Entry Conditionssection select theFast Field Updateoption to run the flows before saving the record. Like below:

-
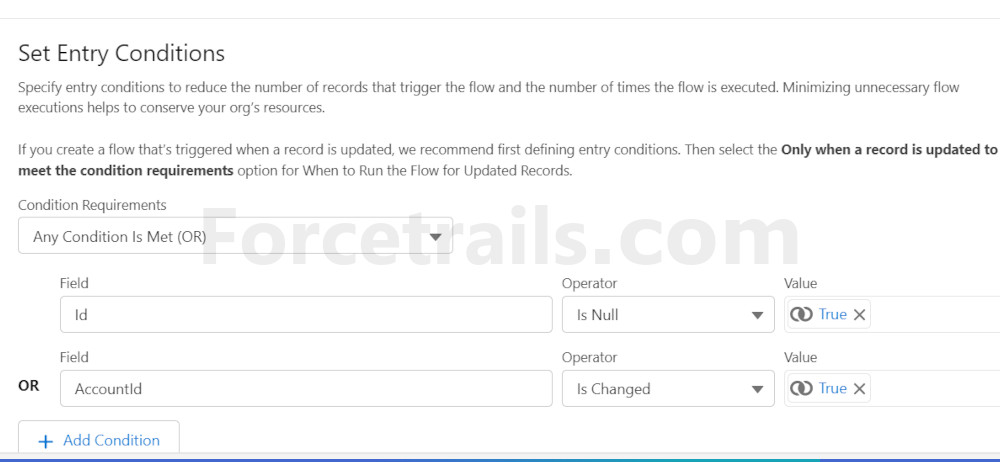
Additionally, you can select entry conditions for flow like the record is
new or some fields are changed. I added conditions in order to check if
the record is new or if the account is changed on the order.

-
Now it's time to set field values using the assignment flow element, so click Done from the bottom right corner and you will see the flow
builder. Click the
+button to add a new element and select Assignment, it will open the New Assignment page.

-
On the New Assignment page, give the label and name, and description to it. Like below:

-
In the
Set Variable Valuessection search forrecordin the Variable input box to select the current record from the flow, which is Order. Then click the right arrow to see the fields and search for the field you want to set the value to.
After that select therecord -> Account -> accountfield name from in thevalueinput box like below:
-
For additional fields click add
Add Assigmentbutton and set the field values. -
This is how it looks after adding assignments for all Billing Address
fields.

- After adding all your requirement assignments click done.
- Save and Activate your flow.
- Time to test your flow.
- Create a new order under an account to see if all assigned field values are populated.
- Debug your flow if any issues.


I hope this was helpful! Let me know in the comments if any questions!
Thanks for reading this post!
No comments :
Post a Comment
Hi there, comments on this site are moderated, you might need to wait until your comment is published. Spam and promotions will be deleted. Sorry for the inconvenience but we have moderated the comments for the safety of this website users. If you have any concern, or if you are not able to comment for some reason, email us at rahul@forcetrails.com